Season Wrap Up
Table of Contents
Wrap Up Introduction
Walkthrough
- Before you begin
- Create a new season
-
Step 1: Getting Started
-
Step 2: Set up next season
- Step 3: Grade of graduation
- Step 4: Member balances
- Step 5: Inventory assignments
- Step 6: Review & finish
Other Considerations
- Leaving and Coming Back to a Wrap Up
- Canceling or Restarting a Wrap Up
- Sharing Members with Other Programs
Wrap Up Introduction
What is it?
There is a new permission called Can manage seasons and access season wrap-up where the user can add/edit seasons and is also able to run the Season Wrap-up process. You can learn more about this permission in the User Management help doc.
As part of your "end-of-year" process, the Season Wrap Up is the process of progressing members from one season into another. This process will create a "Progression Plan" that determines three things for your members:
- Their Progression - whether or not they will be continuing their membership in your program next season
- Their Balance - how you deal with any money owed or credits/overpayments that members still have at the end of the season
- Their Inventory Assignments - how you deal with any inventory items still assigned to any members
Please be aware that Inventory assignments mean ALL inventory: Instruments, Attire, Music, and Equipment!
At this time, Announcements and Forms are not transferable to the new season; however, Events are. Once in the new Season, Events can be moved from the previous season to the new/current one.
Understanding Seasons
At the core of this wrap-up process is the concept of Seasons. Seasons are similar to school years but are flexible enough to handle other situations for programs that may want multiple seasons per year or perhaps don't feel it's necessary to have more than one season. For a more detailed explanation of Seasons, see the help document here: Seasons.
Program memberships technically belong to seasons, which means that at the beginning of each season, you are creating a new program membership for returning members. For non-returning members, their old program membership will still exist, but a new one will not be created in the new season.
For the other seasonal data such as Financials, Announcements, Events, and Inventory assignments, each new season will begin with a blank slate. However, you will still be able to access information from previous seasons by toggling into those seasons.
Walkthrough
Before you begin
Before you begin your season wrap up, there are a few things we suggest doing:
- Ensure all of your Program Member information is accurate and up to date for your current season
- Only non-graduating and Active members will come forward to the new season
- Graduating and inactive members will NOT come forward to the new season
If you would like you're inactive members to appear in your new season and move them up a grade level you will need to re- activate them prior to starting the season wrap up. This will allow you to promote the members up a grade level and graduate inactive members. Once you have moved into the new season you can inactivate any members that are still in inactive status.
If you do not want your inactive students to appear in your new season you can leave them in inactive status. Please note, once the season wrap up has been completed you will need to go back to the previous season to view inactive student information.
- Ensure your program's financial records are current and all member balances are up to date
- Ensure CutTime is updated with any inventory items that were returned
Please coordinate with your users on who is responsible for running the Wrap Up Process, as only one Wrap Up is allowed to be completed at a time. Once a wrap up process has begun, no other user is allowed to start a new wrap up for the same season
Create a new Season
The first step in completing your wrap up is to make sure your next season is set up to receive the advancing members.
- Go to your Program Settings page.
- Click "Manage Seasons", where you should see your current season in the table already.
- Click "Add season".
- Assign a name to your new season (there will be a default pre-populated, which you can change if you'd like) and choose an estimated start date.
- Note: The estimated start date is simply a data field to help CutTime put your seasons in chronological order. You can wrap up your season before, on, or after this date and it will not affect any functionality.
- Click "Create season" and see that it populates in your Seasons table list.
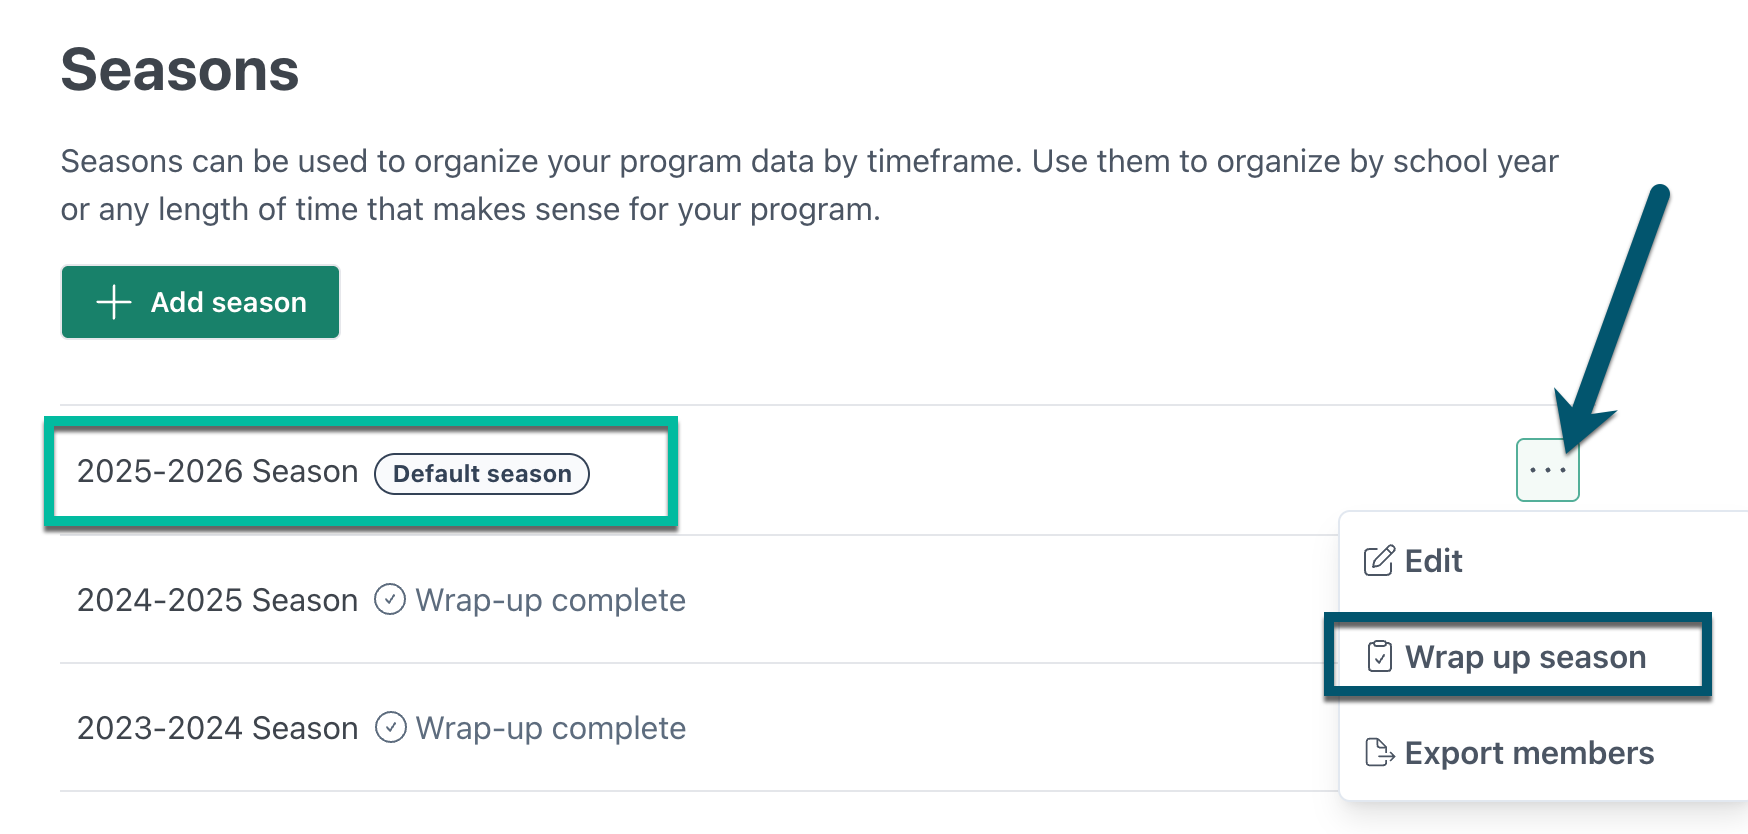
Step 1: Getting Started
- Select the current season
- Click the 3 little dots
-
Click "Wrap Up Season"
- You will get the following screen: (Please read the full message there and watch the video at the top of this article before proceeding)


Once you begin your wrap up, you will be able to leave the page and come back later without losing progress. No need to do it all in one sitting!
- Hit the "Continue" button
Step 2: Set up the next season
- Set up your next season by adding a new one or selecting from your existing seasons. The system will import relevant data from your current season into the next season for you.
- Hit the "Continue" button
Step 3: Grade of graduation
- Tell us what grade your members leave your program. (For example, for middle school programs this might be 8th grade.) The system will use this information to determine which members in your current season will be imported into next season.
- From the dropdown, select the "Grade of graduation" for your program. The graduation grade is the highest grade level you typically see in your program. For a high school this will most likely be 12th grade, for a middle school it might be 7th, 8th, or 9th, etc.
- Whatever you select here, CutTime will assume that any program members who are currently in that grade are not returning next season, i.e. they are "graduating". Any program members who are currently below that grade level is assumed to be returning to the program next season and advanced forward one grade level.
If you have members below the graduation grade who are not returning, you can manually set that in step 6.
- Hit the "Continue" button.
Step 4: Member balances
Choose what you'd like to do with your member balances. CutTime will apply your choices to your members based on progression and balance status, and you'll have a chance to review and make changes to individual members before you finish your wrap-up in step 6.
There are several choices:
- Continuing members with due balances
- Carry over
- This option will take the member's current balance and assign that as their starting balance to begin next season. CutTime will continue to consider this an open balance until the amount is covered next season.
- Cover with Angel Fund
- The Angel Fund is a feature that allows you to track money that's been earmarked for member accounts but not applied to a specific member. Often the Angel Fund is populated by graduating members who have credits left over, but it can also be populated manually in the case of donations or scholarships. See a full rundown of Angel Funds here: Angel Funds and Credit Transfers
- Set balances to zero
- This option takes any amount still owed by a member and zeroes it out, essentially writing it off as a "loss" for the program. If your program has an optional fee structure where fair share fees are encouraged but not required, this option will allow members to begin next season with a clean slate.
- Carry over
- Continuing members with credits
- Carry over
- This option will take the member's current balance and assign that as their starting balance to begin next season. This balance will automatically be applied to any costs created in the new season.
- Transfer to Angel Fund
- This option will take any credits/overpayments and donate them to the Angel Fund, which can then be used to assist other members in paying down their balances. We see this most often with graduating members who do not have younger siblings. See a full rundown of Angel Funds here: Angel Funds and Credit Transfers
- Set balances to zero
- This option will zero out the credits/overpayments for a member and leave them with a blank slate to begin the new season. Choosing this option essentially donates these credits back to the program by removing the earmark for member accounts and returning the amount back to your program's general fund.
- Carry over
- Graduating members with due balances
- Cover with Angel Fund
- Cover due balances with your program's Angel Fund
- Set balances to zero
- Reset due balances to zero and forgive due costs
- Cover with Angel Fund
- Graduating members with credits
- Transfer to Angel Fund
- Transfer credit balances to your program's Angel Fund
- Set balances to zero
- Reset credit balances to zero and delete remaining credits
- Transfer to Angel Fund
NOTE 1: For graduating members, you can choose any option "cover with Angel Fund" or "set balances to zero", then on another screen, step 6, you will have other options to choose from for individual students.
NOTE 2: For any member not returning to the next season and such member either has a debit or credit balance, keep the member active so you can collect the money due. The credit balance can be transferred to a sibling or to the Angel Fund.
- Hit the "Continue" button
Step 5: Inventory assignments
Please be aware that Inventory assignments mean ALL inventory: Instruments, Attire, Music, and Equipment!
Choose what you'd like to do with active inventory assignments. CutTime will apply your choice to all continuing members by default, and you'll have a chance to review and make changes to individual members, step 6, before you finish your wrap-up.
- Continuing members with active assignments
- Carry over
- Import active assignments into the new season
- End assignments
- End active assignments and do not import them into the new season
- Carry over
- Graduating members with active assignments
- End assignments
- End active assignments
- End assignments
- Hit the "Continue" button.
Step 6: Review & finish
We've applied your choices to your program members. You can review and make changes to any member by clicking on them.
- Select Continuing members
- Review the Progression, Balance, and Assignments columns
- You can click on any continuing member and make any changes
- Select Graduating members
- Review the Progression, Balance, and Assignments columns
- You can click on any graduating member
- You can progress them to the next season and indicate their grade level, like 1st year in college
- You can determine what to do with the balance due
- You can determine what to do with the inventory assignment

- When you're done reviewing all your members, click "Finish" to finalize your wrap-up and go to your new season.
Better to take the extra couple seconds now than realize in 6 months that one of last year's seniors never gave their bassoon back!
It is not possible to "reverse" a season wrap up, so be mindful that you've reviewed the wrap up to your satisfaction.
With your wrap up completed, you will be redirected back to your Program Dashboard, which will now be your dashboard for the new season. You should see the name of the new season now appear under your program name on the top left side of your screen. Additionally, navigating back to your Seasons page will show you that the new season has been selected as the new "default season" (see Navigating Seasons for more information).
Other Considerations
Leaving and Coming Back to a Wrap Up
The Season Wrap Up is flexible in that it does not all need to be completed in one sitting. At any point during the wrap up workflow, you can go to a different page, close the tab, or log out altogether and return to continue your wrap up process at a later time. To do this, you simply need to hit the "Save & Exit" button at the top right of your screen. To go back to the Seasons page and click the "Wrap Up Season" link to go back to where you left off.
Canceling or Restarting a Wrap Up
As you go through your wrap up, you may end up needing to cancel and restart the process. This may be the case if you select the wrong option in the bulk strategies phase and continue, or perhaps you may realize you forgot to add some payments, etc. From any part of the wrap up process, you can click "Cancel" at the top of your screen to delete your progress and begin again.
Sharing Members with Other Programs
Share Members
- Creates a list of members to be shared with another program within your district
- Please see the video below for more details on how this function works
Share Members from your Program:
- Go to the Members page
- Click the 3 dots on the top right for more actions and click "Share Members"
- On the Share Members page, you can click the "Share Members" button to start the process of selecting your Members to pass onto another program/school
- Make your selection using the filters then click "Continue"
- Choose the grade progression: "Promote members to next grade" or "Keep members in their current grade"
- Promote is best for end of season transfer
- Keep grade is best for mid-season transfers
- Choose the program you are progressing them to and click "Share Members"
- There is a list of Members you've shared
To accept those incoming members from another school into your program:
- Go to the Members page
- Click the 3 dots on the top right for more actions and click "Share Members" (you will see an indicator of the number of new members)
- On the Share Members page go to the "Shared with You" section and click "Review"
- Choose the Season to import them to
- Note: you can opt to wait to do this until you are in your new Season!
- Accept or reject all or individuals (or make changes to the Grade or status as needed)
- Finish and those members will appear for you in your Members list
Related Blog Articles: