Financial Reporting
Table of Contents
Costs
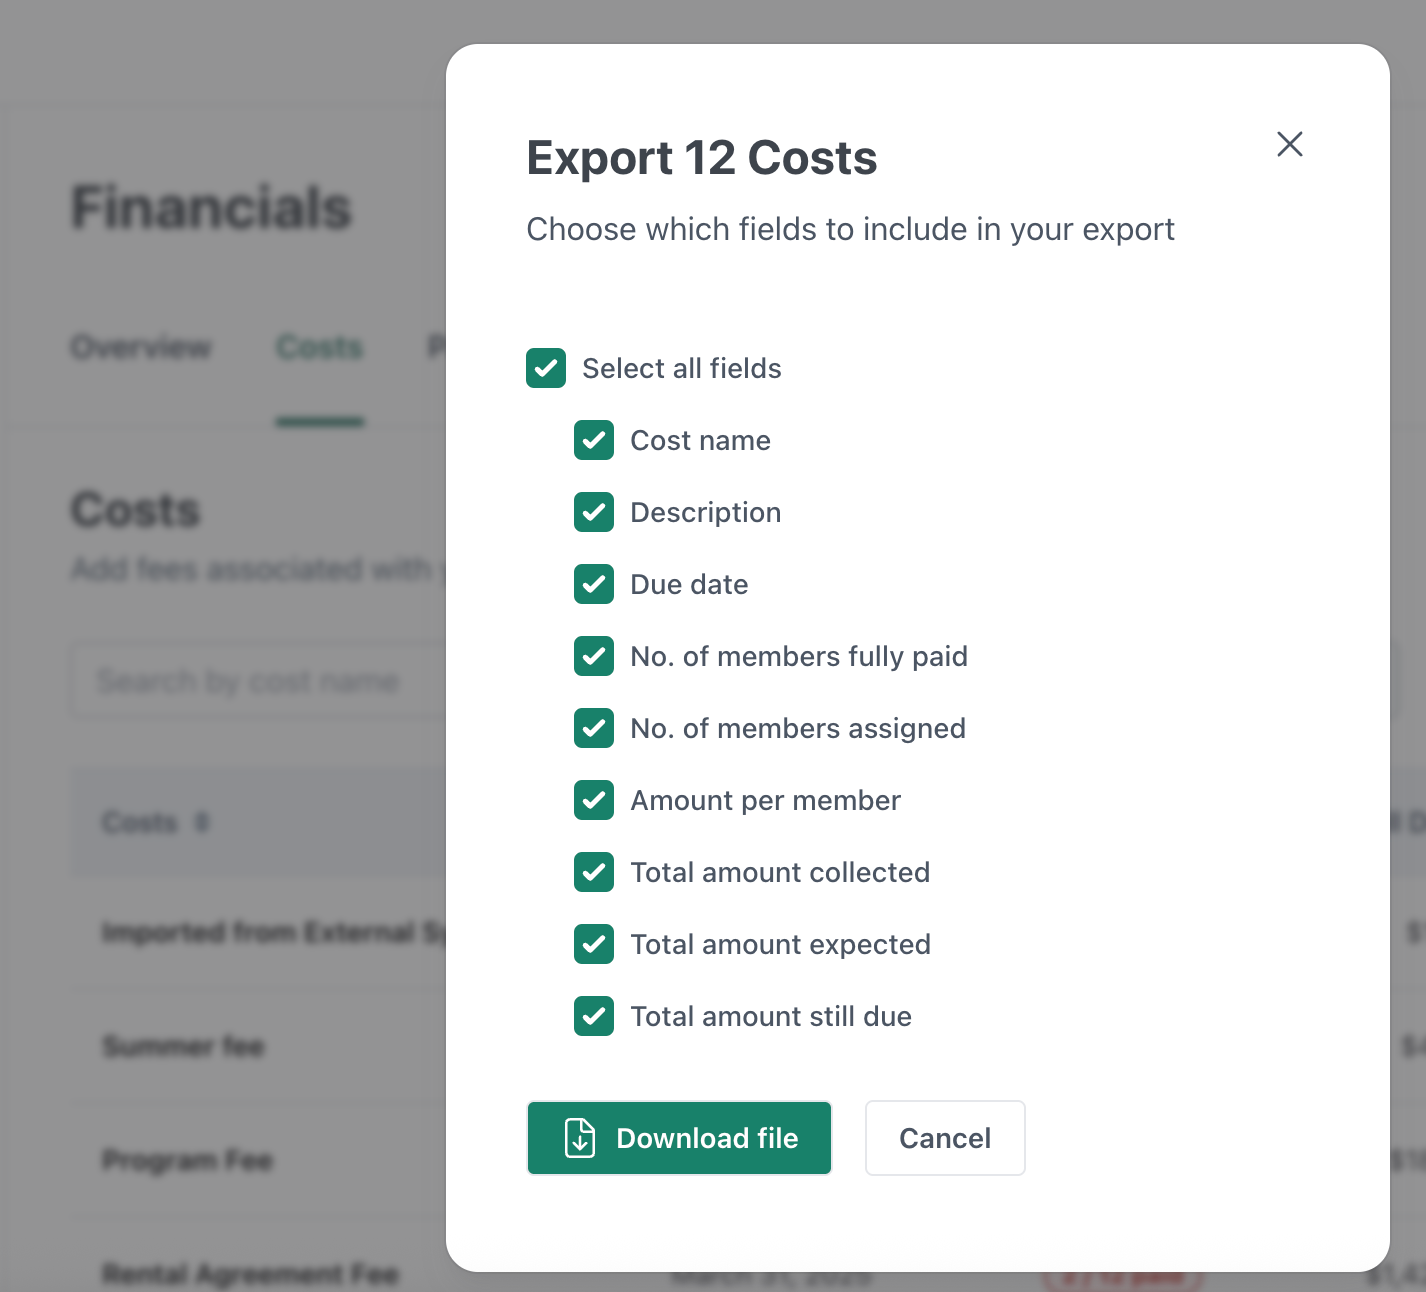
All Costs Export
On the Financials page, click on the "Costs" tab and click the Export button on the top right to download an extract of all your Costs. You can even choose what data points appear on your extract.
Cost Details
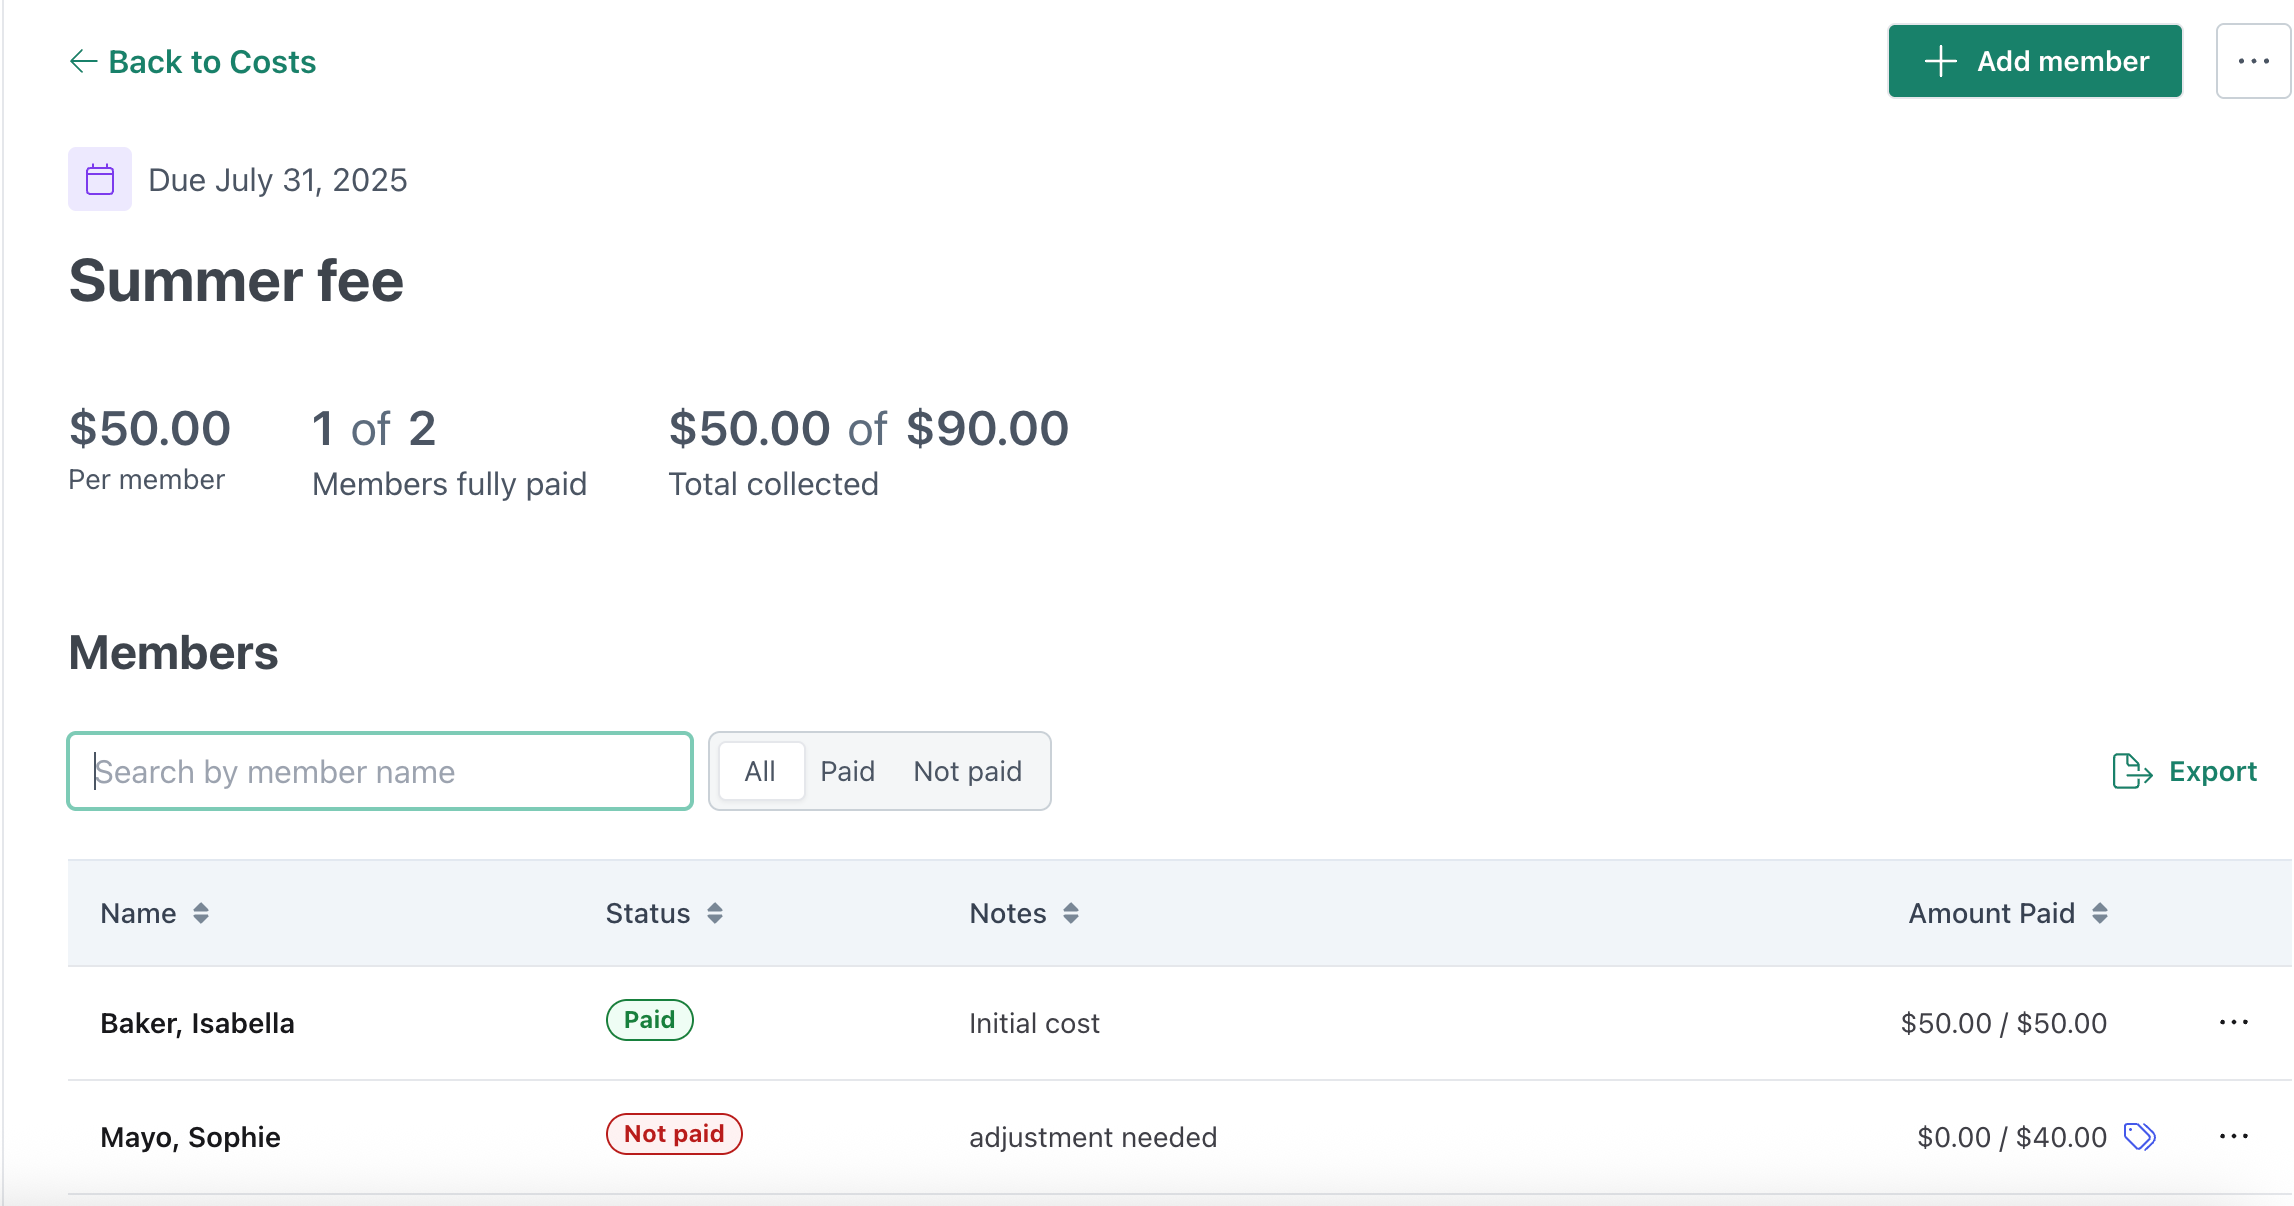
On the Financials page, click on the "Costs" tab and select the cost you'd like to see by clicking on the name of that cost.
This will take you to its Cost Details page where it shows each student this cost has been applied to, along with the amount that has been allocated to this cost for each student.
If any students have had their individual cost amount manually adjusted/prorated, they will appear with a little blue tag on the right side of their row.
CutTime decides how payments are allocated by each cost's due date, so the cost with the oldest due date is payed first. But you can allow payment allocations on your side for manual payments, as well as on the guardian/student side. Check out more info here.
Click the "Export" button at the top of the table to download details about this Cost.
Member Balance Summary
On the Financials page, click the Member Balances tab and you can find a report of all students in your program along with their:
- Cost total
- Payments total
- Transfers in
- Transfers out
- Past Due amount
- Total Balance due
Click the "Export" button to download an extract of your Member Balance Summary.
Exporting Balance Due (Totals) From the Members page
You can also download member balances by going to the Members page. Filter for the members you'd like to see on this report using the available filters on that page, or leave those filters as they are to export all active members. Click "Export results."
On that export, there is a column with the heading Student balance. The data in that column shows how much that student owes, and any negative numbers would indicate an overpayment or credit in their account.
Check out our Financial Statements help doc to learn how financial statements are communicated in CutTime!
Payment Reports
On the Financials page, Payments Tab:
Payment History Page
- The purpose of this page is to show the details and history of payments themselves rather than how that payment was allocated.
-
The Paid or Created by column is populated by the name of person who payed online, or when that payment is manually logged, it is the name of the user who logged that payment.

Exporting All Payments
The Payments Tab on the Financials Page has an "export" button so that you can pull a report of all payments logged.

Choose from the options for exporting your payments info before downloading your extract.


NOTE: this will not include allocation information. That information will be found in the Payment Allocations Report
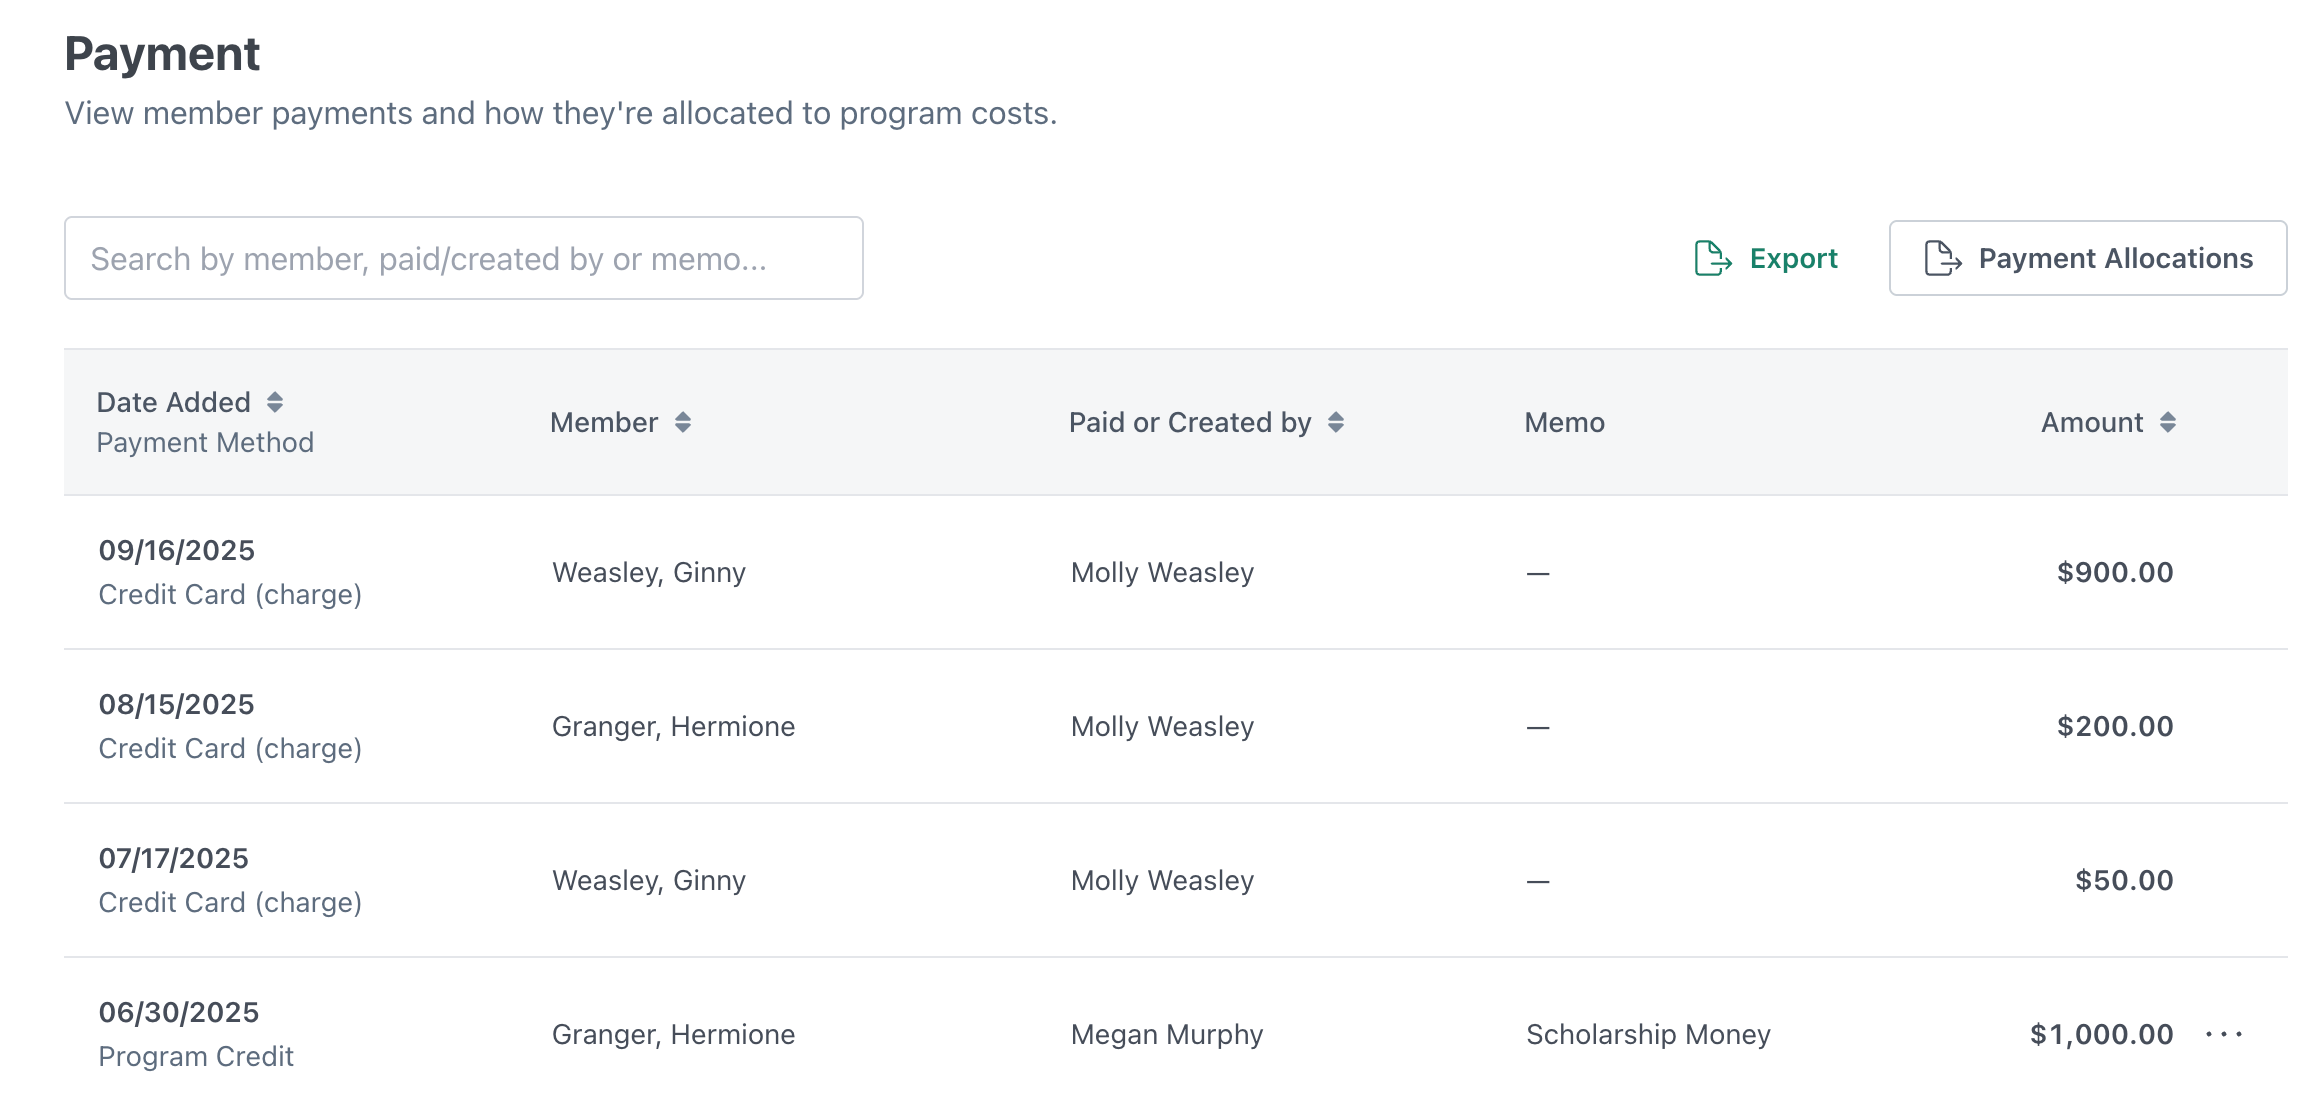
Payment Allocations Report
Go to the Financials Page, Payments Tab and click on the "Payment Allocations" button.
- This report shows a record of payments and the costs to which they were applied.
- Select "Export Allocations" to view the transaction on an Excel file where you can custom sort the data.
- A split payment might occur if someone pays a larger amount than how much they owed for a particular cost. Here's an example for what that might look like:
If a single payment is allocated to multiple costs, you will see this payment split into multiple rows in the table, with each allocation getting its own row. For example:
| Date | Split Payment? | Amount | Memo | Student | Payer | Payment Method | Cost Associated | Disputed? |
| 04/15/2025 | Yes | $10.00 | Check #0000 | Arnold, Ima | Stephen Mayo | Check | T-Shirt | No |
| 04/15/2025 | Yes | $5.00 | Check #0000 | Arnold, Ima | Stephen Mayo | Check | Instrument Fee | No |
Ima has two costs: Cost 1 ($10) and Cost 2 ($5).
Ima makes a single payment of $15. In this table on the Payment Allocations page, this will be displayed as:

Users can re-allocate manual Payments to a specific Cost by editing the Payment on the Member's Membership Details page. (Learn more here)
Stripe Online Payment Reports
See Stripe Connect Overview for more info on Stripe!
Bank Payout Report
- Navigate to your Settings page and click the "Configure Payments" link.
- On the Online Payment Configuration page, click the "View payouts to your bank" link.
Your Bank Payouts page will display your most recent payouts at the top, and you can navigate with the "Next" button to see older payouts. You can also filter by Status, Method Amount, and/or Date as well as export any particular date range you need (exports as a CSV file).
The payout data, when viewed on this screen, will include an overview of the payout, a summary of the transactions included, and the list of the transactions that are included on that payout. You can use this information to accurately compare with the Individual Online Transactions report that's also available on the Online Payment Configuration page.
The export column headings include a default of 13 columns:
Payout ID, Amount, Created (UTC), Currency, Arrival Date (UTC), Source Type, Status, Type, Method, Balance Transaction, Destination Name, Destination Country, Destination Last 4
PLEASE NOTE!
The default setting for Payouts is once a day; also known as a "2-day rolling daily deposit". (This means that every day you get a payment, 2 days later you get the payout.)
To adjust this payout frequency to weekly or monthly deposits, please reach out to Support at support@gocuttime.com.
Individual Online Transactions Report
- Navigate to your Settings page and click the "Configure Payments" link.
- On the Online Payment Configuration page, click the "View individual transactions made to your account" link.
Your Transaction History page will display your most recent online transactions at the top, and you can navigate with the "Next" button to see older transactions. You can also filter by Amount and Date as well as export any particular date range you need (exports as a CSV file).
The transaction data, when viewed on this screen, include payment details, including the name of the student the payment is for under the Description, payment method details, and the timeline for that transaction.
The export column headings include:
Payment ID, Created date (UTC), Amount, Amount Refunded, Currency, Captured, Converted Amount, Converted Amount Refunded, Converted Currency, Fee, Is Link, Mode, Payment Source Type, Status, Taxes On Fee, Application Fee, Application ID