Financials Overview
Table of Contents
Understanding the Financials Dashboard
- Adding a Bulk Cost
- Assigning Cost to Members
- Assigning Existing Costs to a New Member
- Adjusting a Cost
- Adding Custom Costs
- Discounting Costs and Waiving Fees
- Removing a Member From a Cost
- Adding Manual Payments
- Adding a Payment from the Membership Details Page
- Deleting and Editing Manual Payments
- Editing the Cost a manual Payment is Applied to
- "Refunding" Payments
Understanding the Financials Dashboard

Financials Tabs
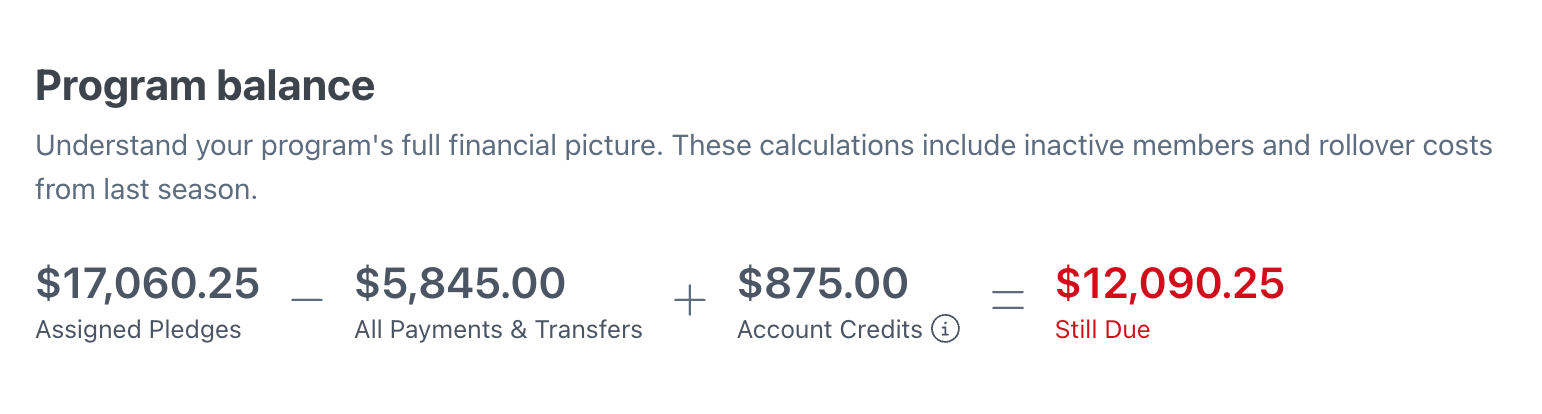
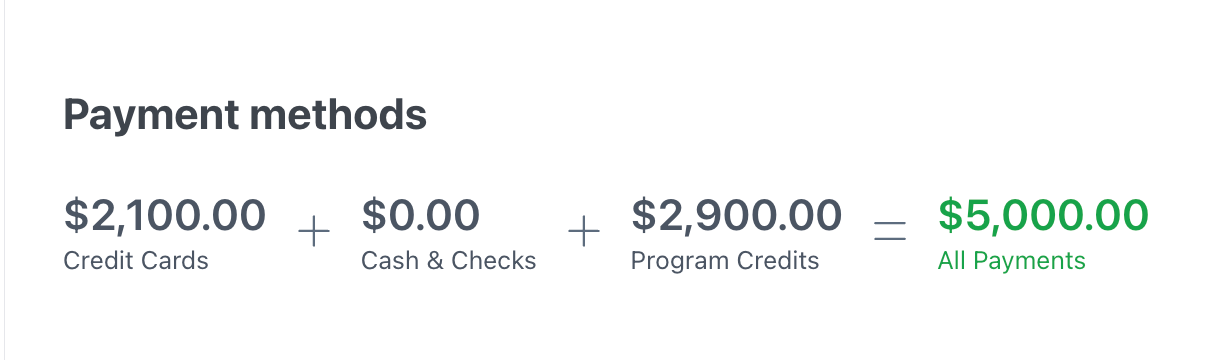
Overview - This tab will give you some basic calculations related to your program's financials. This includes your Program Balance and Payment Methods.
-
The financials calculation from Program Balance contains information pertaining to the Current Season and your active and inactive members, as well as rollover costs and transfers.
-
The calculation for Payment Methods will not include transfers


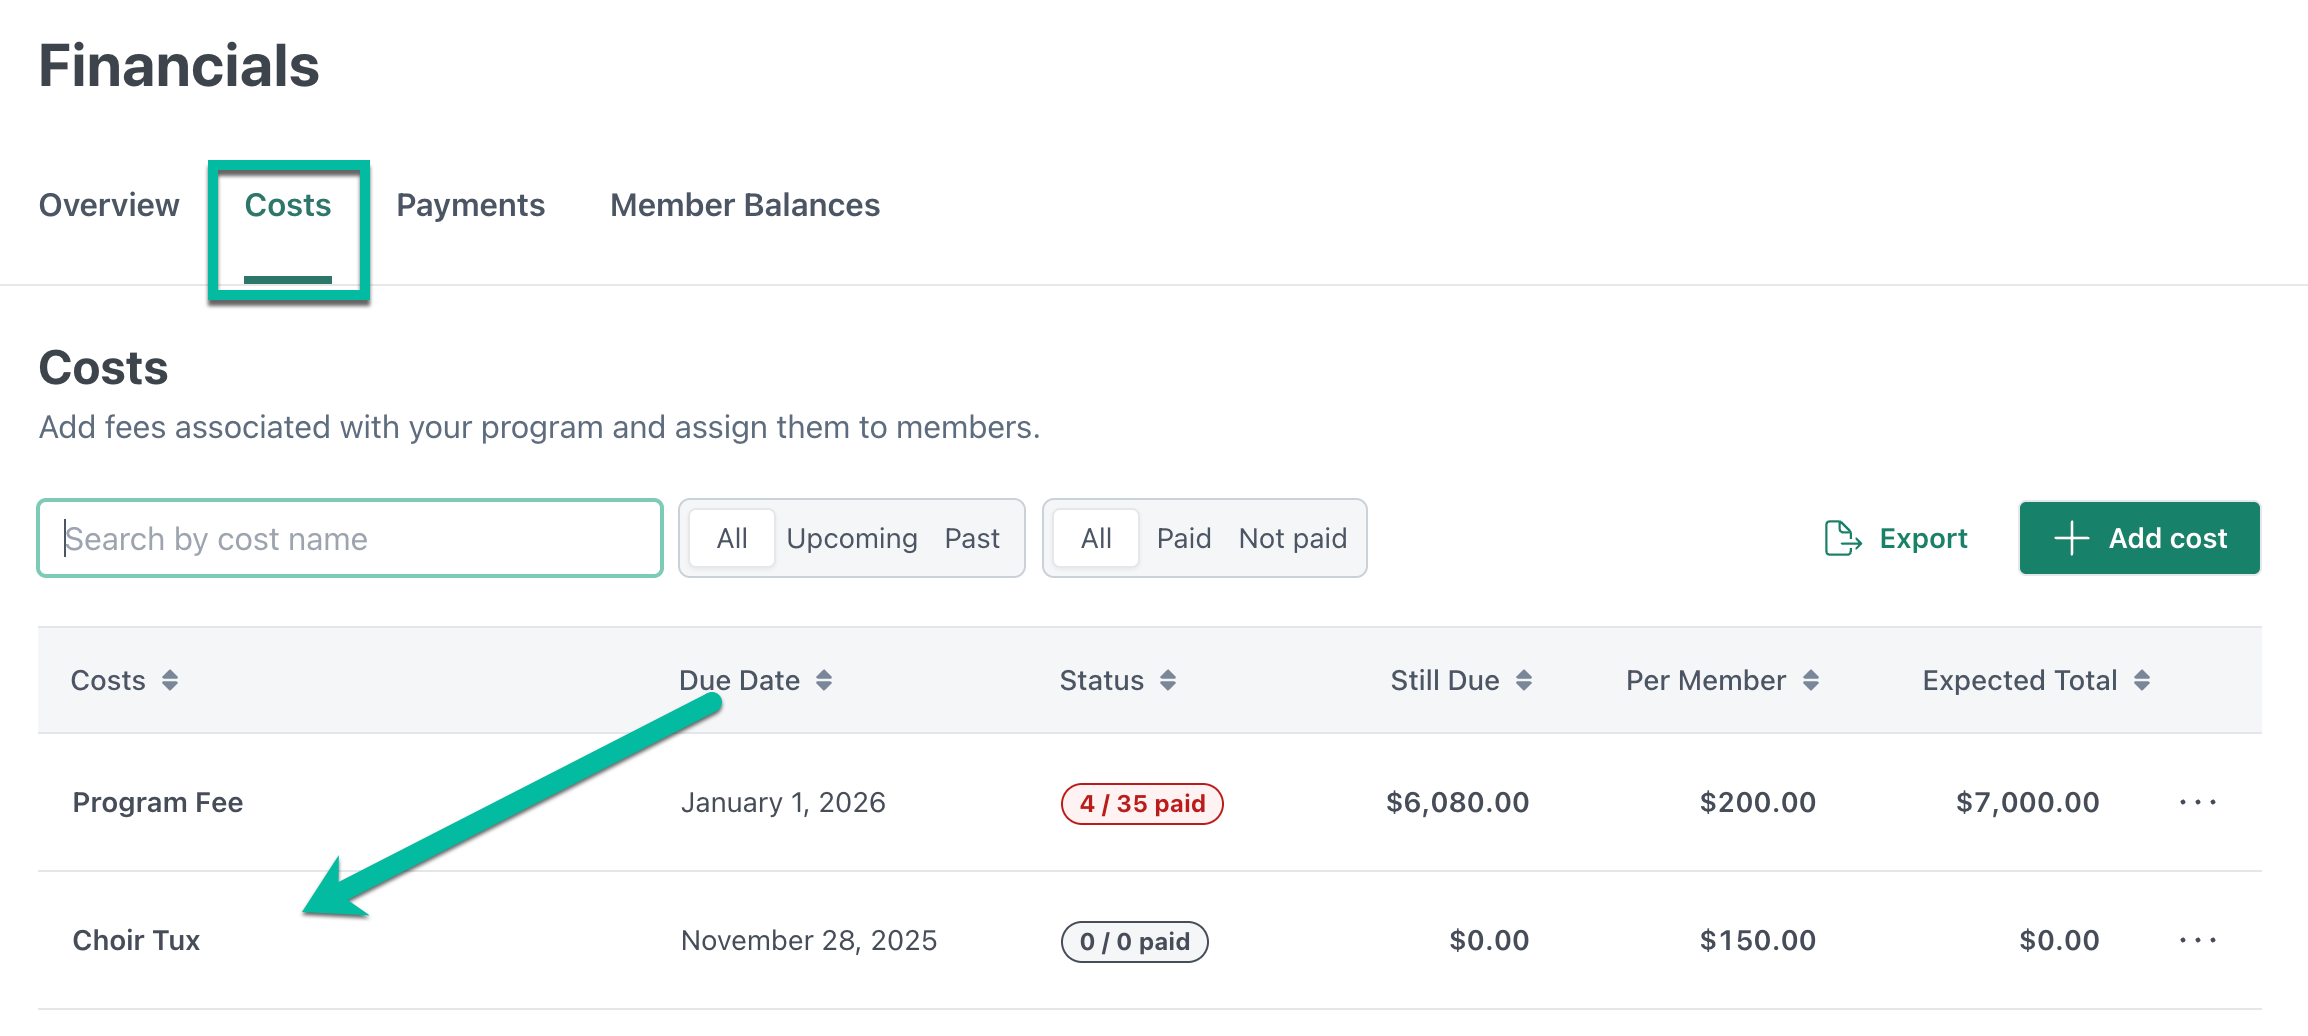
Costs/Pledges - See your program's various Costs or Pledges (named depending on your district level settings) assigned to your Members. Click through on Costs/Pledges to see more details, including extracts of this data.
- If you are in the state of California, your wording will automatically be updated for you and all of the programs within your district/parent organization. (Ex. If you are a part of Example ISD, then all programs/schools within will see "Pledges" if this district is in CA).
- But if you are in another state and would like to adjust the wording from Costs to Pledges, please send in a request to support@gocuttime.com and our team will change your district's Settings accordingly.
Downloading an Extract from the Costs/Pledges tab or a Cost's/Pledge's Details Page will download as a CSV file.
Payments - This tab will list all payments made so far. Click through on "Payment Allocations" to see more details, including extracts of this data.
Downloading an Extract from the Payments Page tab > Payment Allocations Report Page will download as a xlsx file.
Member Balances - Check your Members current balances. Click through on Member Balances to see more details, including extracts of this data.
Downloading an Extract from the Member Balances tab will download as a CSV file.
Quick Actions
These buttons allow you to quickly add a cost or payment, and to setup a payment processor for online payment collection or edit your payment processor that you currently have connected.

Angel Fund
This is the money allocated to the Angel Fund. More details on the Angel Fund can be found here: Angel Fund and Credit Transfers

Starting Balances
Goal: often, newly created/imported students have a balance or credit from the previous year. Here's how to set their starting balance.
Navigate to the Program Settings page, scroll down to Onboarding, where you'll discover two features related to Starting Balances:
- Add Starting Balances: For students with outstanding balances from the prior year, input a cost and label it something like "Carry Forward Balance."
- See the "Adding Custom Cost" video below for more details.
- Add Payments If a student has a credit carried over from the previous year, select the "Add Payments" button on the Financials page to reflect this credit.
- Find the student who you're adding the credit to, fill in the MEMO, AMOUNT, and TYPE. For type, program credit is usually the most applicable.
- Once completed with all the students, press the "Add Payments" button at the bottom of the screen.
Costs
Adding a Bulk Cost
- Navigate to the Financials page, and click the "Add Cost" button. Or click "Add Cost" on the Costs tab page of Financials.
- Give your cost a Title, an Amount, Due Date, and (optionally) a Description.
- Click "Add Cost"
Assigning Costs to Members
- Navigate to the Financials page, and click the "Add Cost" button. Or click "Add Cost" on the Costs tab page of Financials.
-
Click on the Costs tab and then the Cost you need to add members to.
-
Click "Add Member" at the top right or bottom under the members list.
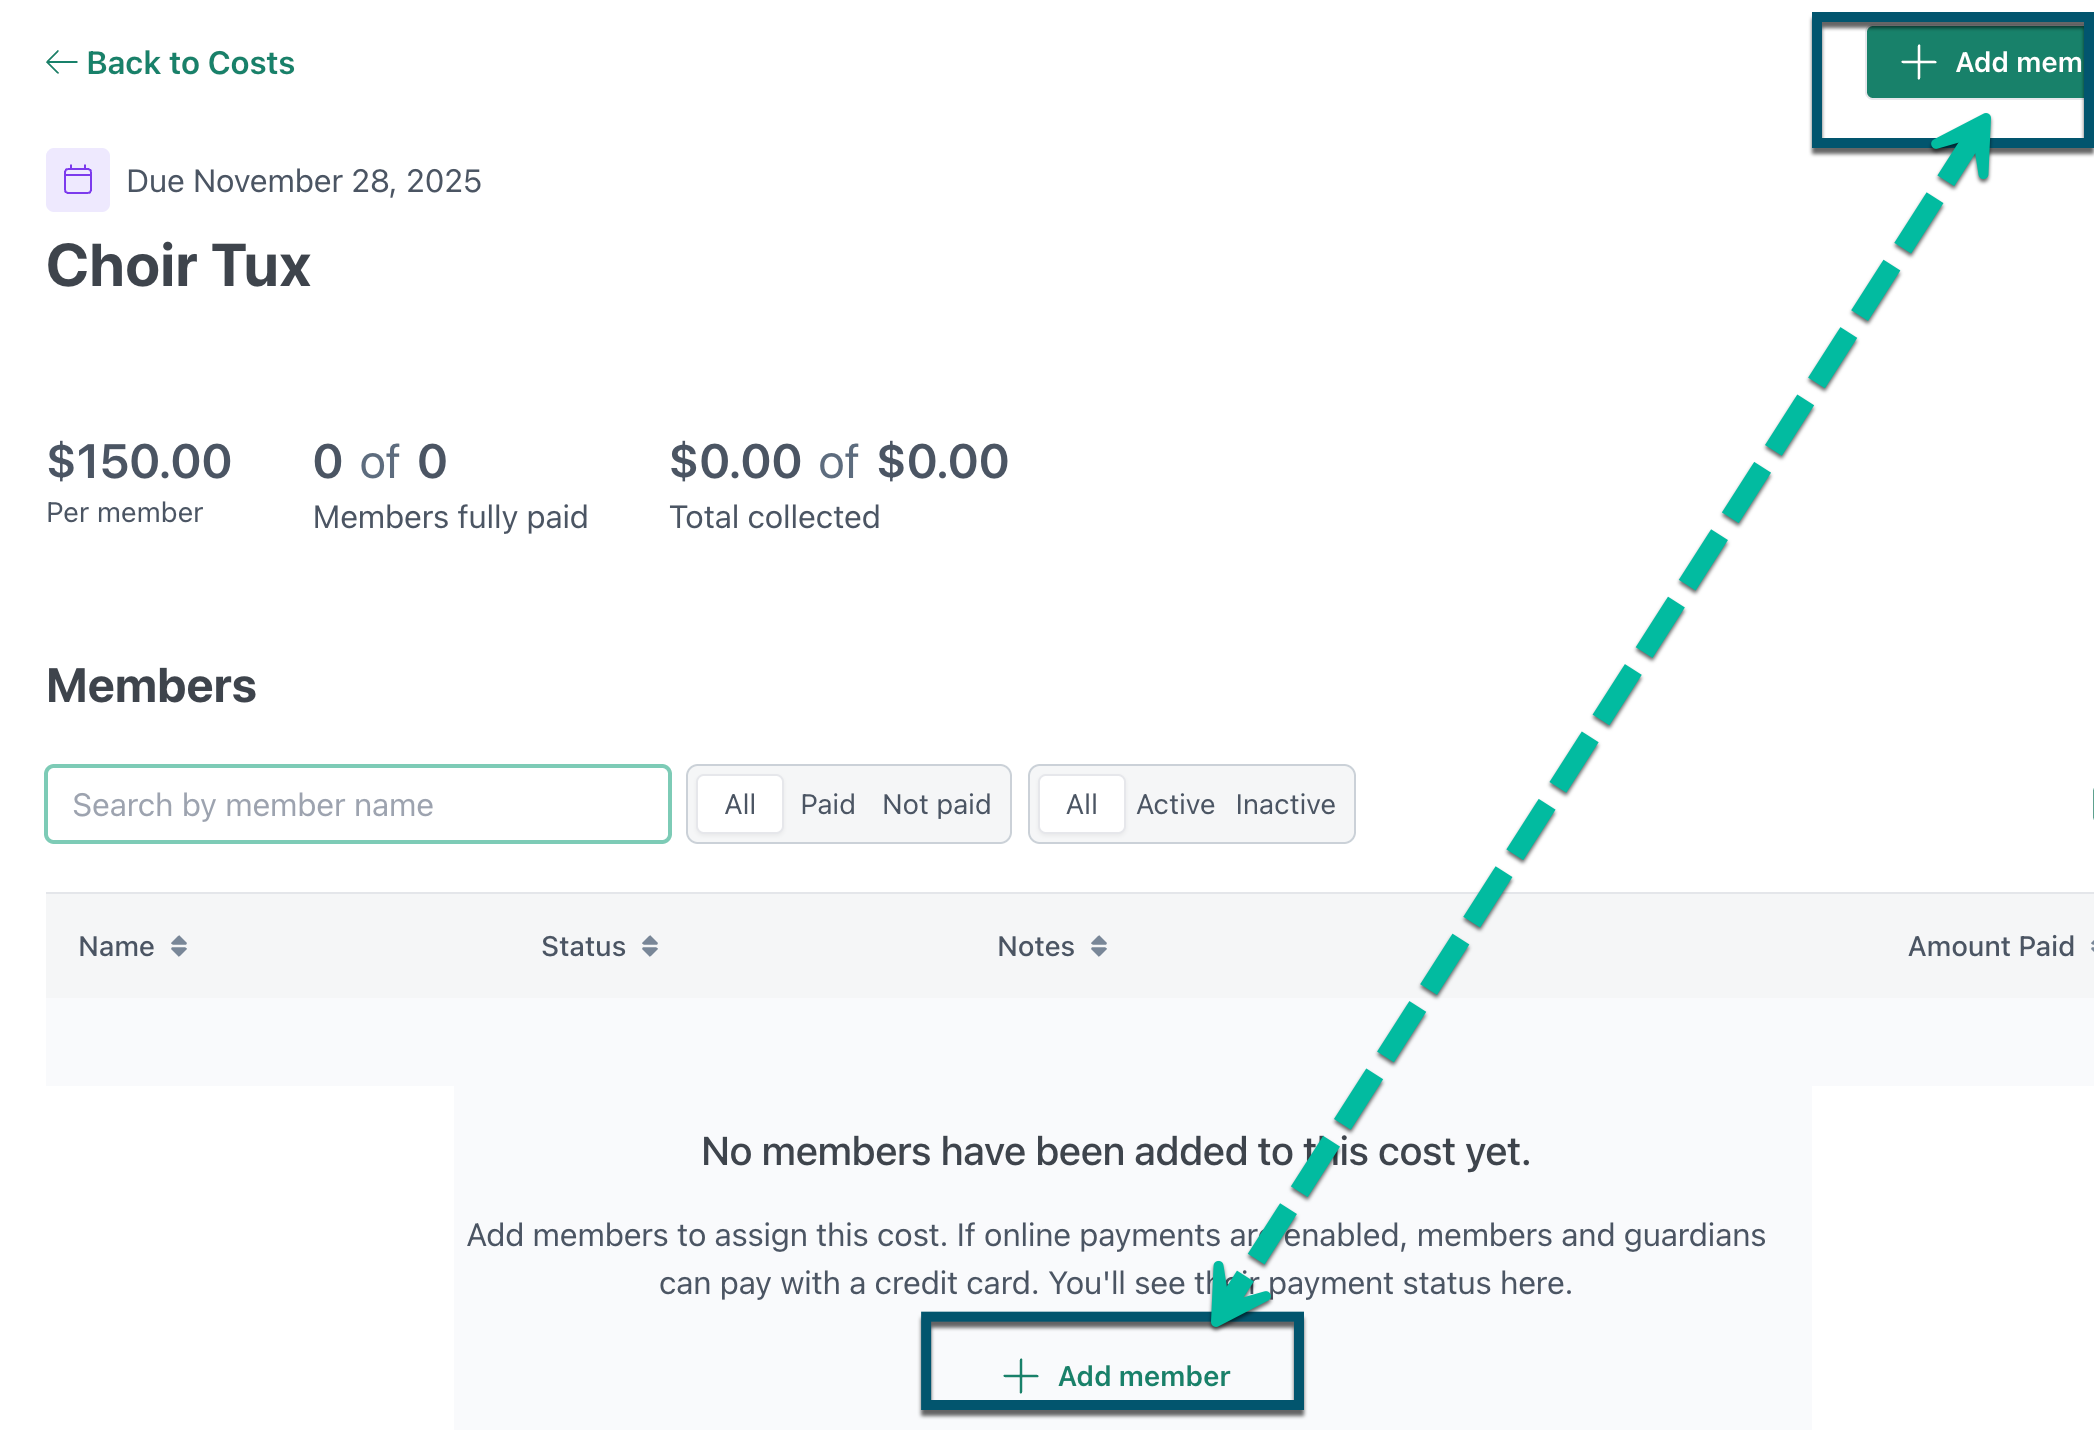
- Choose from the options to make your selections:
- All members without a cost
- Select from list:
- Filter down by Name, Group, and Grade.
-
Use the check boxes to make your selections.


- If you select "Send SMS Notice to Guardians?" The parent will receive a text message or email with a notification and a unique link that will log them into their dashboard.
- Clink on the green "Add members" button.


Assigning Existing Costs to a New Member
If you have just added a new member and need to assign them a set of Costs, you can do so from the Membership Details page for that member.
1) Go to the Members Page and search for the new Member you just added.
2) Click through on their name to be taken to their Membership Details Page.
3) Scroll down to the section that has an overview of the member's financials and click the "Add Cost" button.

4) Choose the "Assign an Existing Cost" option, then the "Next" button to see the list of Costs you can add them to.
5) Select the costs needed, choose to "Notify Guardians" about these new costs assigned or not, then click "Add Costs".


Adjusting a Cost
If you need to adjust anything about a cost you've created, navigate to the Financials page, then the Costs Tab, and click on the name of the Cost you want to adjust.
You can:
- "Add Members" to this cost.
- Use the 3 dots in the top right corner to:
- "Edit", where any changes will be applied to all members who are assigned to this cost. Or
- "Delete", deletes the cost from all members who are assigned this cost.
- "Edit individual", where any changes only apply to that member.
Once you have made you selection above, click the "Save" button where applicable.
If you have members that were added after Costs had already been set up, you will need to add them to the Cost's assignment list manually, as the system does not auto-assign Costs to new members.
Roll Over Costs
Roll over costs are created by the system during the season wrap up if you have made a choice to carry forward balances owed. These costs were considered unpaid by the members assigned at the time of the Season Wrap Up, and so they are carried forward in order to collect the remaining balance.

Editing roll over costs in your current season.
You can:
- Add members to a roll over cost
- Edit individual member amounts owed
- Remove/delete members individually from a rollover cost
- Edit the title, description and due date of the roll over cost (but not the total amount. Only editing individual amounts owed)
- Delete the roll over cost
You CANNOT:
-
Edit rollover costs in the wrapped up season. After a season is wrapped up, all financials are permanently locked in that season.
(Ex. if the roll over cost was generated to carry forward balances from the 2024-2025 season, you can only edit these roll over costs in the current/2025-2026 season).
Adding Custom Costs
Custom Costs are costs where each student owes a unique amount, as opposed to Costs where each student owes the same amount. This is especially useful for creating starting student account balances.
Discounting Costs and Waiving Fees
Goal: Because of a scholarship or volunteer contract, you need to partially or completely reduce a student's fee on a particular cost (this can also be known as "prorating" a cost).
Navigate to the Financials page. After you create a cost for the full amount, navigate to Costs Tab and select the Cost to be changed.
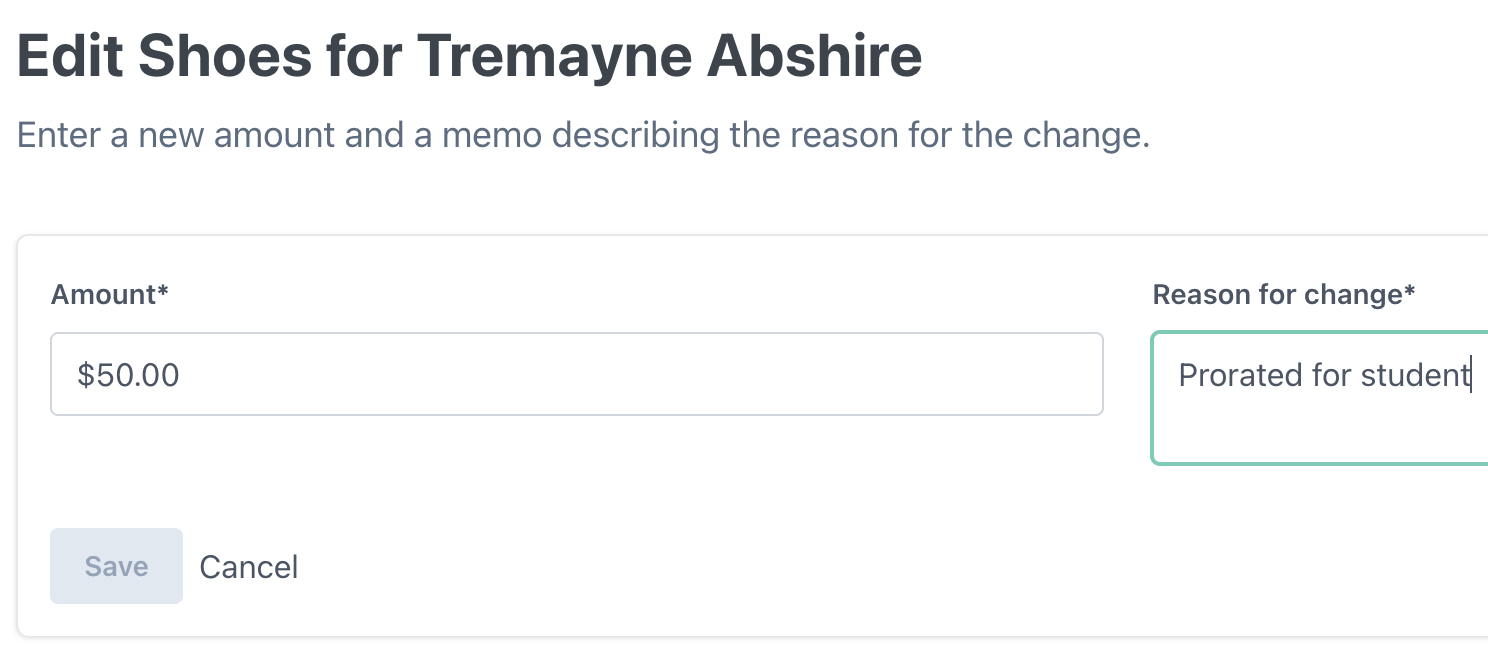
- Find the student whose cost needs to be discounted or removed and click "Edit Individual."
- Adjust the "Amount" to the discounted cost you need and add a reason for your records.
- Click "Save."
Now your student has the correct amount of that cost applied to them! You should be able to see them at the bottom of that cost's details under "Students with customized cost."
Should you still need to list them for this cost, but need to "comp" them for it, you can edit the amount to $0.
Navigate to the Financials page > Costs Tab. Click through on the name of the Cost that you need to remove the Member from.
- Find the student whose cost needs to be discounted or removed and click "Edit Individual."
- Adjust the "Amount" to $0 and add a reason for this change for your records.
- Click "Save."
Removing a Member From a Cost
Goal: To remove a member that was incorrectly added or should no longer have this Cost assigned.
Navigate to the Financials page > Costs Tab. Click through on the name of the Cost that you need to remove the Member from.
- Find the student whose Cost needs to be discounted or removed and click the 3 dots next to their name on the right.
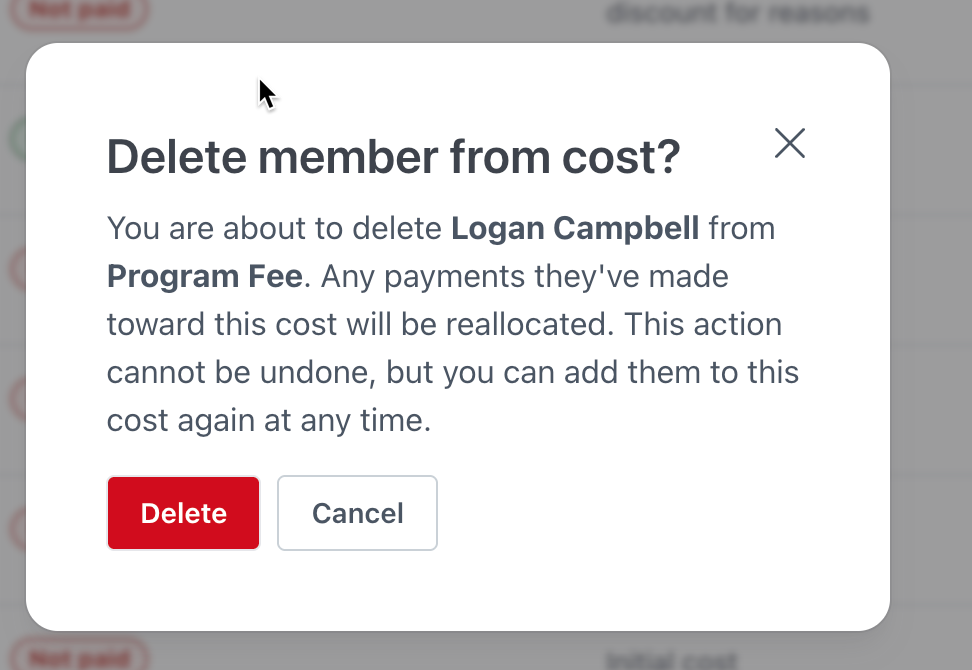
- Click "Delete". A popup will appear for you that will give you more information about what will happen when you remove this person from the Cost:
- Any payments applied to the Cost will be reallocated.
- This action cannot be undone.
-
But should you need to add them back into this Cost you can do that at any time. (But it should be noted that if they were originally listed with a prorated amount on this Cost, that will not reflect when you add them again.)

Payments
UPDATE!: The Payments Tab on the Financials Page now has an "export" button so that you can pull a report of all payments logged.

Note: this will not include allocation information.
For more information about Financial Reporting, click here.
As payments are entered/paid online, those payments will auto-apply to the next Cost available by order of Due Date.
NOTE: If a payment is allocated to a Cost, that payment will not auto-adjust to be applied to another Cost added later, despite due date.
For Example:
- I create two Costs; "Program Fee" due on June 8th ($50) and "Uniform Fee" due on July 8th ($60).
- An online payment is made for $100 and it was applied to those two Costs - paying off the first and partially paying the second Cost.
- Later, a User sets up a new Cost; "Instrument Rental Fee" due June 26th ($25).
- The payment that was made previously would still be applied to "Uniform Fee" due on July 8th, and would not move over to the "Instrument Rental Fee" with a due date earlier of June 26th.
In order to adjust this, you would need to edit the Cost's due date that the payments applied to another date, then edit it back the the original due date. This will re-allocate payments to the Costs by order of due date.
Users can also opt to select the specific Cost they are entering a Payment for. (See more info here) And for manual Payments that were previously entered, you can also Edit them to adjust which Cost they apply to. (See more info here)
Adding Manual Payments
See the full Paying for Costs document for the Guardian/Member perspective.
- Navigate to the Financials page and click "Add Payments"
- Find the student's name on this page who you'd like to add the payment to.
Typing "ctrl + f" or "cmd + f" on this page and then typing the student's name can help you find them quickly!
- Add a memo, amount, and type of payment to the row for that student. The NEW column will show you what their fees will be after adding this payment to their account.
Fundraising profits are usually logged as "Program Credits" with a description of the fundraiser in the memo line!
- Repeat step 2 & 3 for as many students as you need.
- Scroll down to the bottom of this page and click "Add Payments"
Logging a Payment from the Membership Details Page:
- Go to the Members Page and select the student
- Scroll down to the Transaction History section
- Click "Add Payment" and enter the payment details
- This is also how you can designate or allocate a payment towards a specific Cost for that Member.
Payment Allocations
Payment allocations are also available on the guardian's and student's end in their magic link if you have a Payment Processor connected in your account. Learn more about guardian/student payment allocations here.
Payment Allocations Settings
To allow or turn off the ability to designate payments to a specific Cost or for your members/guardians to be able to pay towards specific Costs, go to the Settings page under the Online Payments section.

Deleting and Editing Manual Payments
- Go to the Members page and find the member you'd like to edit or delete a payment from
- Click on their name - this will take you to their Program Membership Details page.
- Scroll to the bottom of this page to find the "Payments" section
The Payments section is below the "Transaction Summary" and list of costs!
- On the right side of the row showing the payment, click the three dots to open the menu to either delete or edit the payment.
This is also where you can re-allocate manual payments applied to a specific Cost!

Refunds:
Currently, CutTime does not have a dedicated function to refund your members/guardians. But if there have a manual payment that was added incorrectly or that needs to be refunded, you can remove that payment from their details page.
- Go to the Members page and click on the name of the student.
- Scroll down to the Payments section table and find the payment you need to remove/adjust to log a refund.
- Click the 3 dots next to that payment to either "Delete" the payment or "Edit" it.
- If you need to give them a partial refund, then choose "Edit" and adjust the amount to subtract what you are refunding and add a note.
If the payment you are trying to remove is from an online payment, you won't see the Edit or Delete options. Instead, you will need to add a custom cost to help off-set the refund in their balance.
List the cost as a refund for the same amount that you will be refunding them for with a note, and then refund them outside of CutTime (by check, etc.).
Deleting and Editing Costs from a Member's Details Page
- Go to the Members page and find the member you'd like to edit or delete a cost from.
- Click on their name - this will take you to their Program Membership Details page.
-
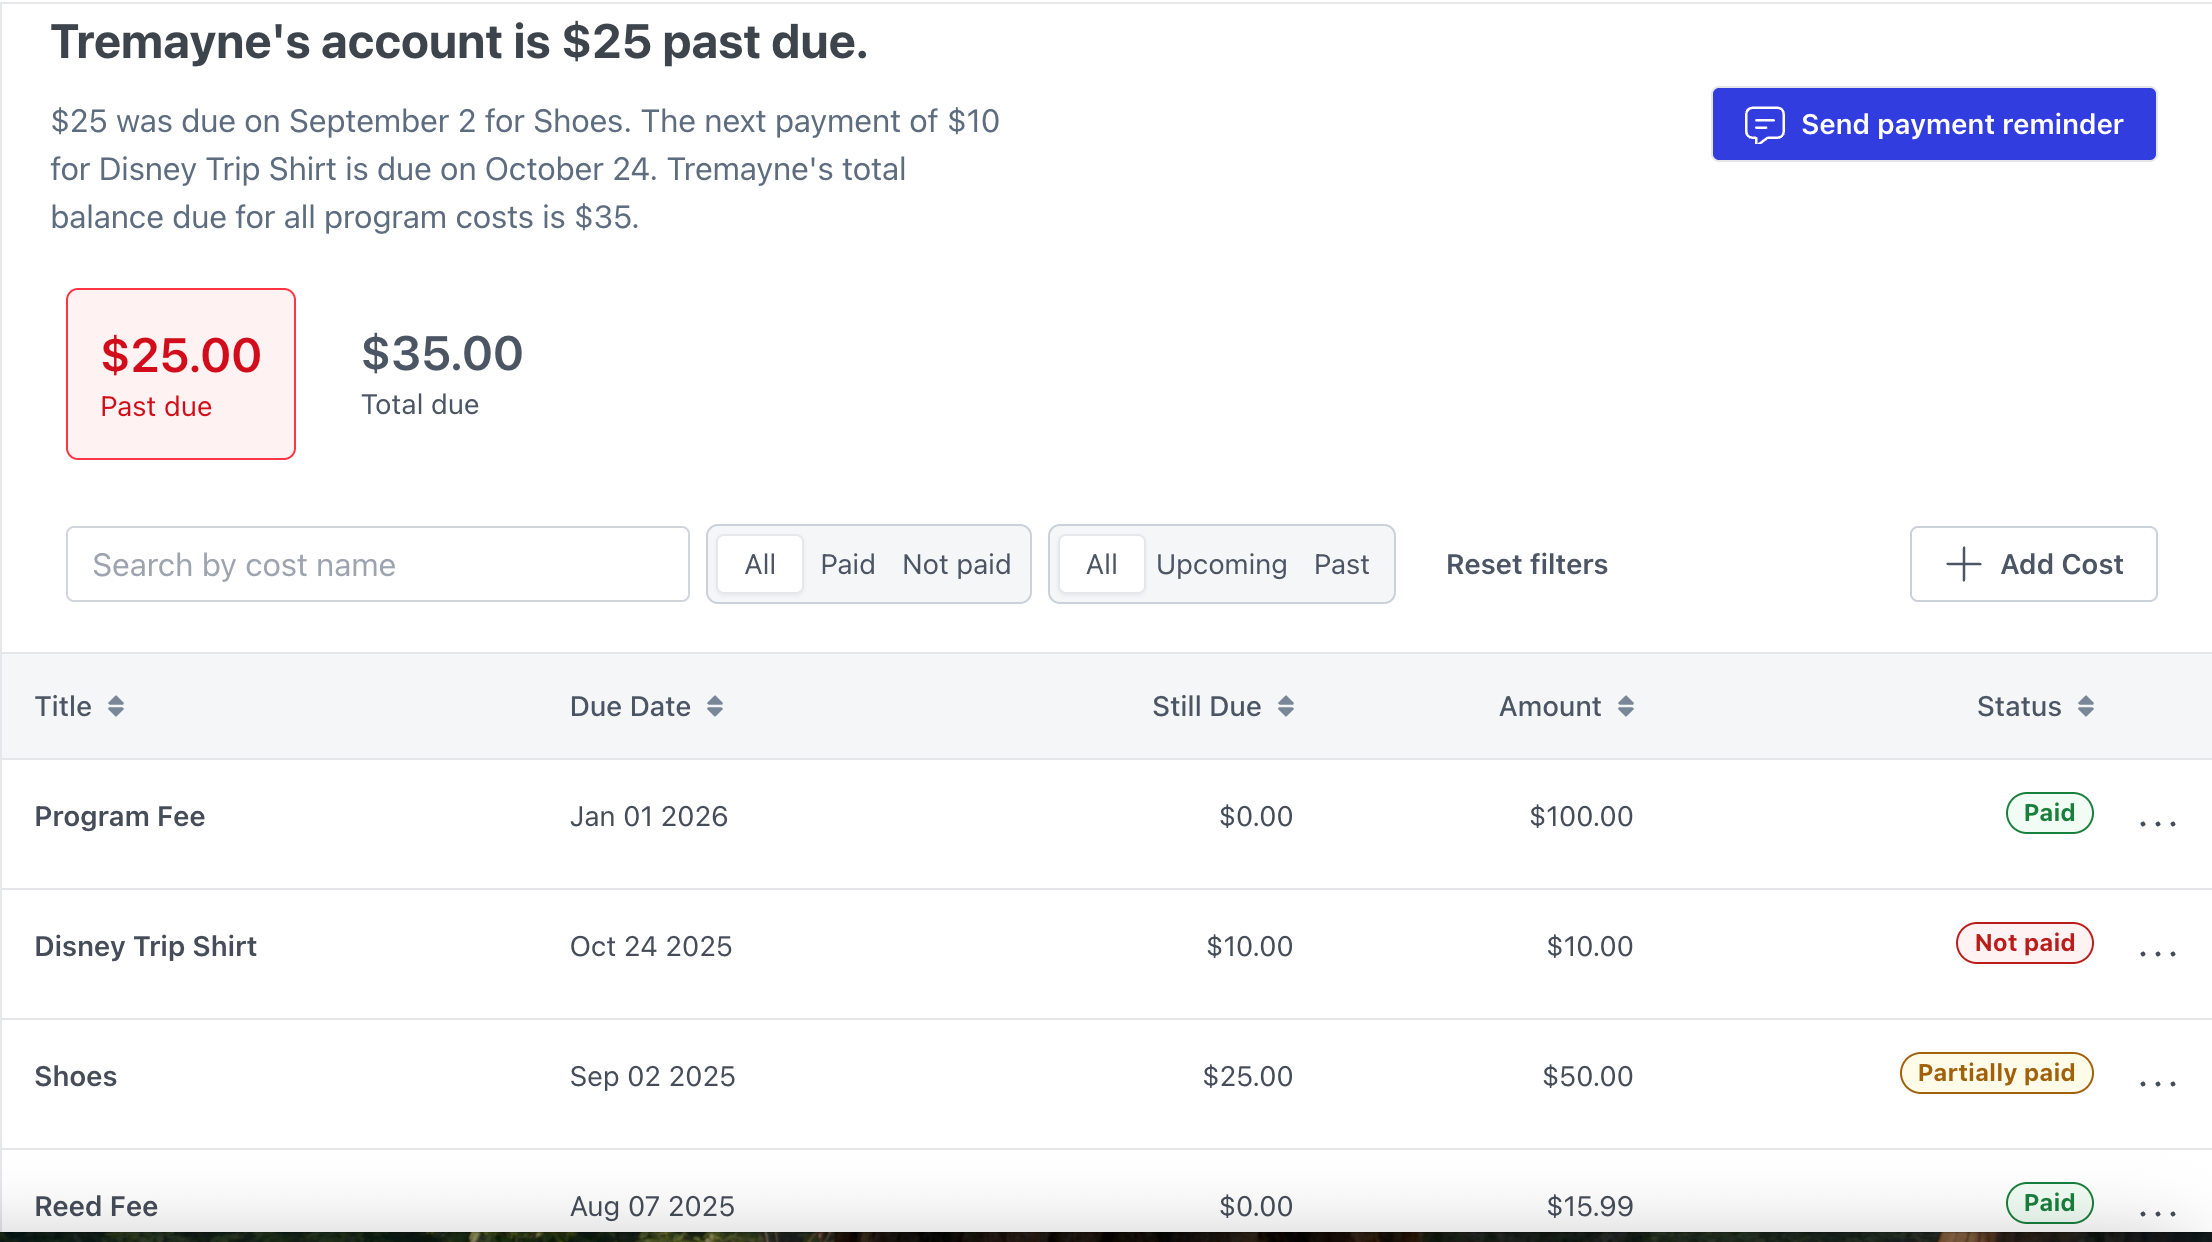
Scroll to the bottom of this page to find the Financials Overview section - this will start with a short summary of their balance.
- Click on the 3 dots next to the cost that needs to be removed and click either "Edit" or "Delete".
- If you choose delete, a popup will appear for you that will give you more information about what will happen when you remove this person from the Cost:
- Any payments applied to the Cost will be reallocated.
- This action cannot be undone.
-
But should you need to add them back into this Cost you can do that at any time. (But it should be noted that if they were originally listed with a prorated amount on this Cost, that will not reflect when you add them again.)
-
If you need to edit the amount owed, you can adjust that and list a reason for the change
- If you choose delete, a popup will appear for you that will give you more information about what will happen when you remove this person from the Cost:


Best Practices
Links to various help documents that you might find helpful to review related to Financials in CutTime.
Relevant Blog Articles: